Add certificate to the list of trusted certificates
This step involves adding the public key of your certificate or the whole PKCS bundle into the keystore file of trusted certificates in Payara Server domain. This is to make the server recognize the certificate as trusted, in case an external party or another Payara Server instance provide it. This step is optional, if you only intend to secure inbound channels, such as HTTP listeners. But it will do no harm to follow the procedure in any case.
이 단계에서는 Payall Server 도메인의 신뢰할 수있는 인증서의 키 저장소 파일에 인증서의 공개 키 또는 전체 PKCS 번들을 추가합니다. 이것은 외부 또는 다른 Payara Server 인스턴스가 인증서를 제공 할 경우 서버가 인증서를 신뢰할 수있는 인증서로 인식하도록하기위한 것입니다. HTTP 수신자와 같은 인바운드 채널을 보호하려는 경우에만이 단계를 수행 할 수 있습니다. 그러나 어떠한 경우에도 절차를 따르는 데 아무런 해가 없습니다.
The default keystore file for trusted certificates can be found at <Payara_install>/glassfish/domains/mydomain/config/cacerts.jks.
신뢰할 수있는 인증서의 기본 키 저장소 파일은 <Payara_install> /glassfish/domains/mydomain/config/cacerts.jks에서 찾을 수 있습니다.
We need to import our public key file (mycert.crt) into the cacerts.jks keystore with following command:
다음 명령을 사용하여 공개 키 파일 (mycert.crt)을 cacerts.jks 키 저장소로 가져와야합니다.
keytool -importcert -trustcacerts -destkeystore cacerts.jks -file mycert.crt -alias mydomain_certificate
The command will ask for password to the cacerts.jks keystore - this should be the same password as the domain master password.
이 명령은 cacerts.jks keystore에 대한 암호를 묻습니다.이 암호는 도메인 마스터 암호와 동일한 암호 여야합니다.
In case of PKCS bundle (mycert.p12), following command will do the same:
PKCS 번들 (mycert.p12)의 경우, 다음 명령은 동일한 작업을 수행합니다.
keytool -importkeystore -destkeystore cacerts.jks -srckeystore mycert.p12 -srcstoretype PKCS12 -alias mydomain_certificate
The certificate will be installed under alias mydomain_certificate.
인증서는 별칭 mydomain_certificate 아래에 설치됩니다.
Replacing an old certificate
If you already have a certificate in your domain and you want to replace it because it will expire soon, you might want to replace it with a new one. In order to do it so that no further configuration changes in the domain are required, you need to remove the old certificate first, before installing the new certificate. Following keytool command will do that:
도메인에 이미 인증서가 있고 곧 만료되므로 교체하려는 경우 새 인증서로 교체 할 수 있습니다. 도메인에서 더 이상 구성을 변경할 필요가 없도록하려면 새 인증서를 설치하기 전에 먼저 이전 인증서를 제거해야합니다. 다음 keytool 명령을 사용하면됩니다.
keytool -delete -alias mydomain_certificate -keystore keystore.jks
To replace the certificate also in trusted certificates keystore, issue the same command also for cacerts.jks file:
신뢰할 수있는 인증서 keystore에서도 인증서를 바꾸려면 cacerts.jks 파일에도 동일한 명령을 실행합니다.
keytool -delete -alias mydomain_certificate -keystore cacerts.jks
After removing the old certificate, continue adding the certificate as described before. Just remember that the certificate is referred to in the domain configuration by its alias, therefore the alias of the new certificate must be the same as the alias of the old certificate.
이전 인증서를 제거한 후에는 앞에서 설명한대로 인증서를 계속 추가하십시오. 인증서가 별칭으로 도메인 구성에서 참조되므로 새 인증서의 별칭이 이전 인증서의 별칭과 동일해야합니다.
If you want to replace the certificate used by secure admin, it is recommended to refresh all the secure admin settings by running command to turn on secure admin (even if it is already on):
보안 관리자가 사용하는 인증서를 바꾸려면 안전 관리자를 사용하려면 (이미 켜져 있어도) 명령을 실행하여 모든 보안 관리자 설정을 새로 고치는 것이 좋습니다.
asadmin start-domain mydomain (if domain not yet started)
asadmin enable-secure-admin
asadmin restart-domain mydomain (to apply changes)
Enable security on HTTP listener
At this point, the certificate is available for use in your domain. You may use it to secure an HTTP listener or replace the default certificate for the listener http-listener-2, which is secured by default.
이 시점에서 귀하의 도메인에서 인증서를 사용할 수 있습니다. HTTP 리스너를 보호하거나 기본적으로 보안이 설정된 리스너 http-listener-2의 기본 인증서를 바꿀 수 있습니다.
First, we need to start the server with our domain.
먼저 도메인을 사용하여 서버를 시작해야합니다.
While server is running, we can use either asadmin or administration console in the web browser to configure the HTTP listener.
서버가 실행되는 동안 웹 브라우저에서 asadmin 또는 관리 콘솔을 사용하여 HTTP Listener를 구성 할 수 있습니다.
Securing HTTP listener using admin console
Open admin console in your browser, by default it is located at http://localhost:4848/.
브라우저에서 관리 콘솔을 열면 기본적으로 http : // localhost : 4848 /에 있습니다
Go to Configurations -> server-config -> HTTP Service -> HTTP Listeners > my-http-listener, where my-http-listener is the HTTP listener you want to configure. By default, there already exists http-listener-2, which is already secured by TLS protocol, using default certificate with alias s1as and listens on port 8181.
구성 -> server-config -> HTTP 서비스 -> HTTP Listener> my-http-listener로 이동하십시오. 여기서 my-http-listener는 구성하려는 HTTP Listener입니다. 기본적으로 TLS 프로토콜로 보안이 설정된 http-listener-2가 이미 존재하며 별칭이 s1as 인 기본 인증서를 사용하고 포트 8181에서 수신합니다.
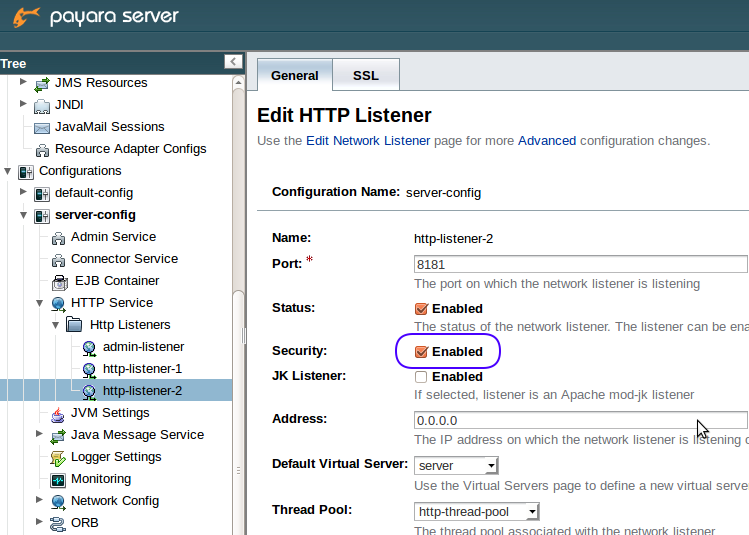
If you are adding security to an insecure listener, make sure that security is enabled, as in the following picture:
안전하지 않은 수신기에 보안을 추가하려면 다음 그림과 같이 보안이 사용 가능한지 확인하십시오

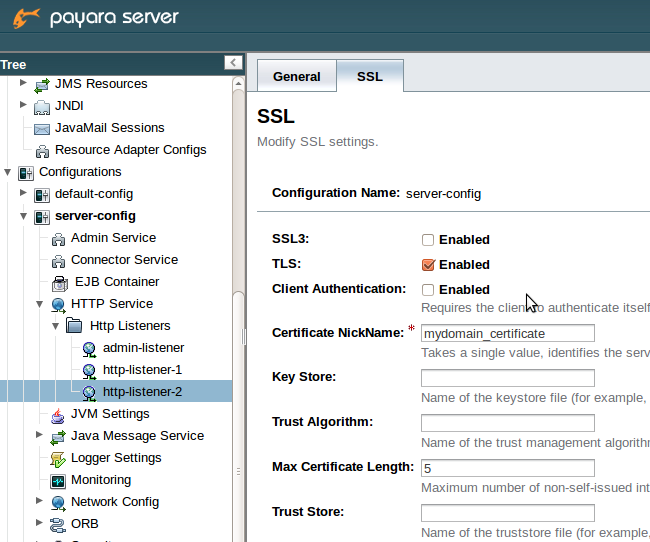
On the SSL tab, TLS should be enabled. It is not recommended to enable SSL3, as it is superseded by TLS protocol and is not widely used. Moreover, there are some security issues with SSL3 protocol.
SSL 탭에서 TLS를 사용하도록 설정해야합니다. SSL3은 TLS 프로토콜로 대체되어 널리 사용되지 않으므로 SSL3을 사용하도록 설정하지 않는 것이 좋습니다. 또한 SSL3 프로토콜에는 몇 가지 보안 문제가 있습니다
On the SSL tab, we also want to apply our new certificate - Certificate NickName should contain the alias of our certificate. In our case it is mydomain_certificate.
SSL 탭에서 새 인증서를 적용하려고합니다. 인증서 닉네임에는 인증서의 별칭이 있어야합니다. 우리의 경우에는 mydomain_certificate입니다

If you are not sure about the alias of your certificate, use following command to find out its alias from the mycert.p12 bundle:
인증서 별칭에 대해 잘 모르는 경우 다음 명령을 사용하여 mycert.p12 번들에서 별칭을 찾습니다
keytool -list -keystore mycert.p12
If you run the same command against keystore.jks file, you will see the same certificate among other certificates already in the domain keystore (there are already 2 certificates by default: glassfish-instance and s1as).
keystore.jks 파일에 대해 동일한 명령을 실행하면 도메인 키 스토어에 이미있는 다른 인증서 중 동일한 인증서가 표시됩니다. 기본적으로 glassfish-instance 및 s1as라는 두 개의 인증서가 이미 있습니다
Finally, you may test the configuration changes in your web browser. With a web application deployed at context root webapp and listener using port 8181, open the following address and check that the connection is secured using the new certificate: https://localhost:8181/webapp or https://<yourdomain>:8181/webapp.
마지막으로 웹 브라우저에서 구성 변경 사항을 테스트 할 수 있습니다. 컨텍스트 루트 webapp 및 리스너에 웹 응용 프로그램을 배포하고 포트 8181을 사용하여 다음 주소를 열고 새 인증서 인 https : // localhost : 8181 / webapp 또는 https : // <yourdomain> : 8181 / webapp을 사용하여 연결이 보안되는지 확인합니다..
Securing HTTP listener using asadmin
With asadmin, each configuration step is represented by one or more asadmin CLI commands, which set configuration properties using dot notation:
asadmin을 사용하면 각 구성 단계가 점 표기법을 사용하여 구성 등록 정보를 설정하는 하나 이상의 asadmin CLI 명령으로 표시됩니다
- Make sure that the security is enabled for listener named http-listener-2:
http-listener-2라는 리스너에 대해 보안이 사용 가능한지 확인하십시오.
asadmin set configs.config.server-config.network-config.protocols.protocol.http-listener-2.security-enabled=true
- Make sure that TLS protocol is enabled for listener http-listener-2
리스너 http-listener-2에 대해 TLS 프로토콜이 사용 가능한지 확인하십시오.
asadmin은 configs.config.ser를 설정합니다.
asadmin set configs.config.server-config.network-config.protocols.protocol.http-listener-2.ssl.tls-enabled=true
asadmin set configs.config.server-config.network-config.protocols.protocol.http-listener-2.ssl.tls11-enabled=true
asadmin set configs.config.server-config.network-config.protocols.protocol.http-listener-2.ssl.tls12-enabled=true
There are 3 versions of TLS protocol available. It is good practice to enable all 3 versions to degrade gracefully for older clients. But you may turn on only TLS 1.2 as well, if you only run the last command. You don't get such granularity when using admin console.
TLS 프로토콜에는 3 가지 버전이 있습니다. 구형 클라이언트의 경우 3 가지 버전 모두 정상적으로 성능 저하되도록하는 것이 좋습니다. 그러나 마지막 명령 만 실행하는 경우 TLS 1.2도 설정할 수 있습니다. 관리 콘솔을 사용할 때 이와 같은 세분성을 얻지 못합니다
- Apply our new certificate with alias mydomain_certificate to the listener http-listener-2:
- 새 인증서 인 mydomain_certificate을 http-listener-2 수신기에 적용합니다
asadmin set configs.config.server-config.network-config.protocols.protocol.http-listener-2.ssl.cert-nickname=mydomain_certificate
Turn on security on admin listener
It is possible to secure connections to admin console in a similar way as to any other HTTP listener. However, it is only recommended to turn on SSL security on admin listener when you need to access the admin console or run asadmin commands remotely and using the domain name that matches your certificate. Also mind that SSL will be used for communication between instances and domain admin server within a cluster.
다른 HTTP Listener와 비슷한 방식으로 관리 콘솔에 대한 연결을 보호 할 수 있습니다. 그러나 관리 콘솔에 액세스하거나 원격으로 asadmin 명령을 실행하고 인증서와 일치하는 도메인 이름을 사용해야하는 경우에만 관리자 수신기의 SSL 보안을 켜는 것이 좋습니다. 또한 SSL은 클러스터 내의 인스턴스와 도메인 관리 서버 간의 통신에 사용됩니다
If you really need to secure admin listener, repeat the same steps in admin console as for other HTTP listeners, with following exceptions:
관리자 리스너의 보안을 정말로 필요로하는 경우 다음 예외를 제외하고 다른 HTTP 리스너의 경우와 동일한 단계를 관리 콘솔에서 반복하십시오.
before security is enabled for admin listener, ensure that all admin users have non-empty password
관리자 수신기에 대한 보안이 활성화되기 전에 모든 관리 사용자가 비어 있지 않은 암호를 갖고 있는지 확인하십시오
asadmin change-admin-password
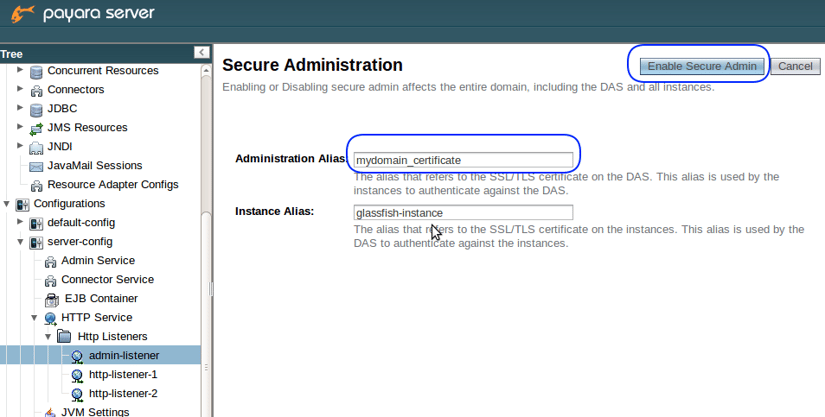
- to enable security for admin listener, use button Enable secure admin on Secure Administration page - a link to this page is provided under Security checkbox in admin-listener general configuration page, as well as through admin console menu: server (Admin server) -> General -> Secure Administration
- 보안 관리 페이지에서 보안 관리자 사용 -이 페이지에 대한 링크는 관리 리스너 일반 구성 페이지의 보안 확인란과 관리 콘솔 메뉴를 통해 제공됩니다. 서버 (관리 서버) -> 일반 -> 보안 관리
- you may set your certificate for admin listener using the Secure Administration page - replace s1as in the field Administration Aliaswith the alias of your certificate, or you may set your certificate later in the same way as with usual HTTP listeners. The latter option will mean that the default certificate will be used for connections to admin console until you set your certificate
- Secure Administration 페이지를 사용하여 admin listener에 대한 인증서를 설정할 수 있습니다. Administration Alias 필드의 s1as를 인증서의 별칭으로 바꾸거나 나중에 일반 HTTP Listener와 같은 방식으로 인증서를 설정할 수 있습니다. 후자의 옵션은 인증서를 설정할 때까지 기본 인증서가 관리 콘솔에 연결되는 데 사용됨을 의미합니다.
- note that after pressing Enable secure admin, the server will restart and you will be redirected to admin console running with https protocol. If there are any other instances in the domain, you need to restart all of them as well.
- Enable secure admin (보안 관리 사용)을 누르면 서버가 다시 시작되고 https 프로토콜로 실행되는 관리 콘솔로 리디렉션됩니다. 도메인에 다른 인스턴스가있는 경우 모든 인스턴스도 다시 시작해야합니다.
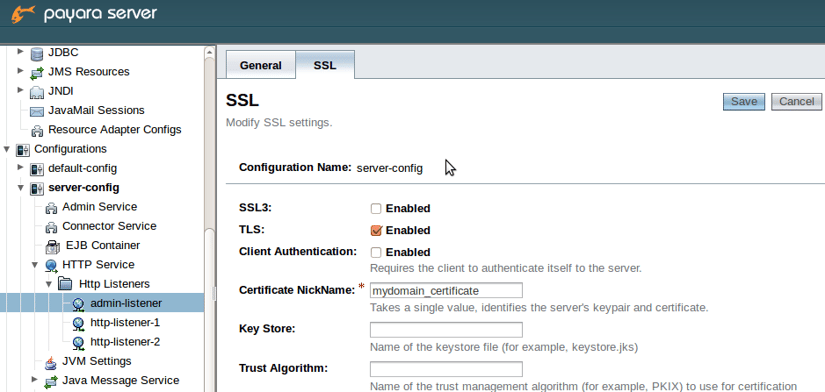
Before admin security is enabled:

After admin security is enabled:

Again, secure admin listener can be enabled also by asadmin command:
다시 asadmin 명령을 사용하여 보안 관리자 수신기를 활성화 할 수 있습니다.
asadmin enable-secure-admin --adminalias=mydomain_certificate
After this command you need to restart the server, as well as other instances in the domain.
이 명령 다음에 도메인의 다른 인스턴스는 물론 서버를 다시 시작해야합니다.
If you need to tweak the configuration further, you may use the same asadmin commands with admin-listener as with other HTTP listeners.
구성을 추가로 조정해야하는 경우 다른 HTTP Listener와 마찬가지로 admin-listener와 동일한 asadmin 명령을 사용할 수 있습니다.
Summary
Hopefully you now understand how to add certificates into Payara Server and how to use them to secure communication with SSL. Although it is not difficult, it requires to do several steps, involving openssl, keytool and admin console. We have tried to provide explanation for all the necessary and optional steps, with alternative ways to accomplish them in different operating systems and using either admin console or asadmin. It is up to you to decide which approach fits you better to accomplish your security requirements.


